
Configure Google Offer Properties
Overview
The Google tab of the Wallet Pass Details screen allows you to configure the Wallet Pass properties for Members using Google devices. As you make changes to the configuration, the platform displays a preview render of the Wallet Pass as it will appear on Google devices.
The Google tab is organized into the following sections, each of which is described below in more detail:
-
Barcode: Configure the barcode settings of the Wallet Pass.
-
Color & Images: Customize the visual elements of the Wallet Pass.
-
Front Content: Design the primary view that displays essential information to Members.
-
Details: Provide comprehensive information such as detailed terms and conditions, in addition to the Front Content.
-
Links: Provide useful links.
-
Settings: Optionally enable pass sharing.
-
Test Preview: Preview the pass functionality for Google devices using a specified Test Member.
Barcode
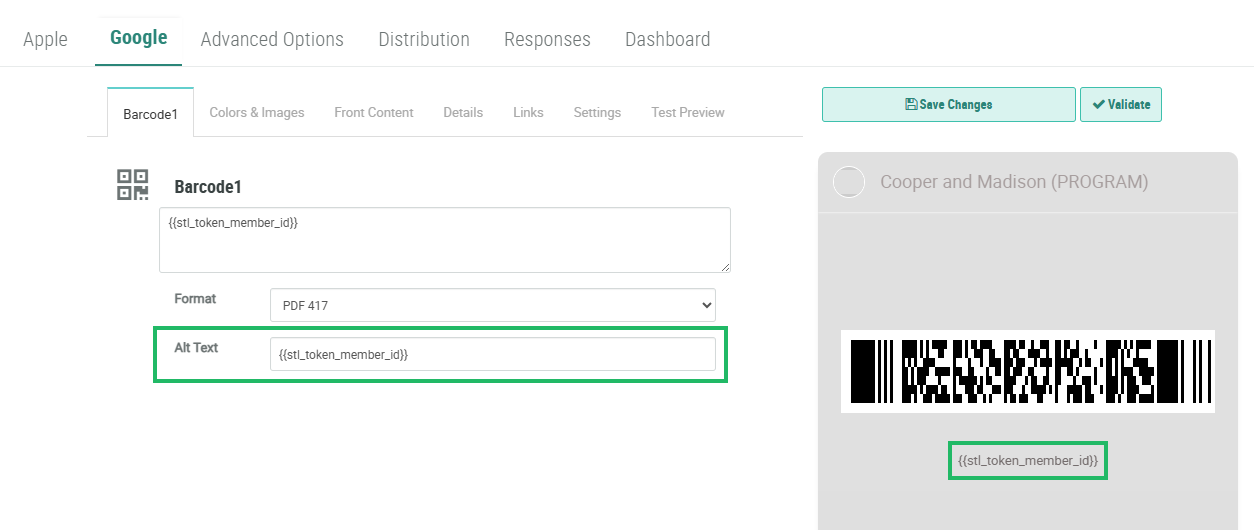
The Barcode section is used to configure the barcode that appears on the Mobile Wallet Pass. The preview rendering on the right updates automatically as you make configuration changes.
-
Select the
-
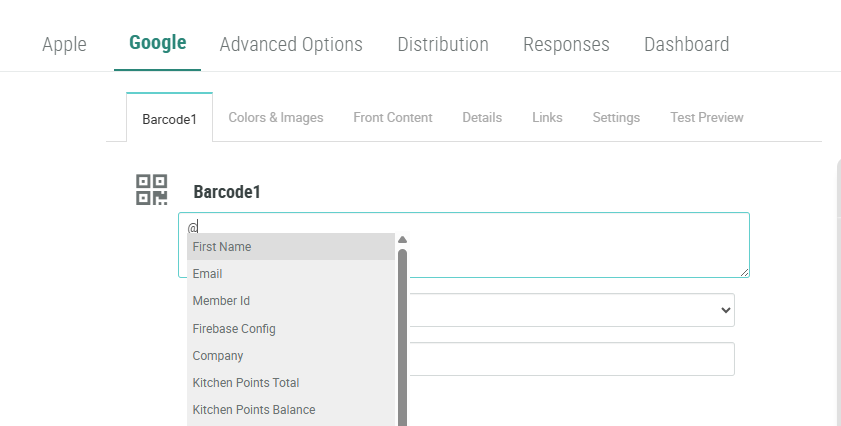
Set the barcode value using one of the following methods:
-
For a fixed number (like a coupon code), type the number directly in the Barcode Value field.
-
For personalized values, enter "@" to bring up a menu of available Content Tokens; select the desired Content Token.
-
Utilize Liquid templating to display Offer or Offer Response information. A common use case is to use Liquid templating within the Barcode value to display the unique certificate code assigned to a Member. For example:
-
{%- for offer_response in offer_responses -%}
{%- if offer_response.processing_status == 'pending' -%}
{{ offer_response.certificate_codes -}}
{%- break -%}
{%- endif -%}
{%- endfor -%}-
From the Format drop-down menu, select a barcode format:
-
QR Code: Best for storing more information
-
PDF 417: Common for boarding passes
-
Aztec: Efficient space usage
-
Code 128: Ideal for numeric data
-
-
Optionally, in the Alt Text field, enter alternate text using one of the following methods:
-
For a fixed value, type the value directly in the Alt Text field.
-
For personalized values, enter "@" to bring up a menu of available Content Tokens; select the desired Content Token.
-
Utilize Liquid templating to display Offer or Offer Response information.
-
-
Click Save Changes.
Color & Images
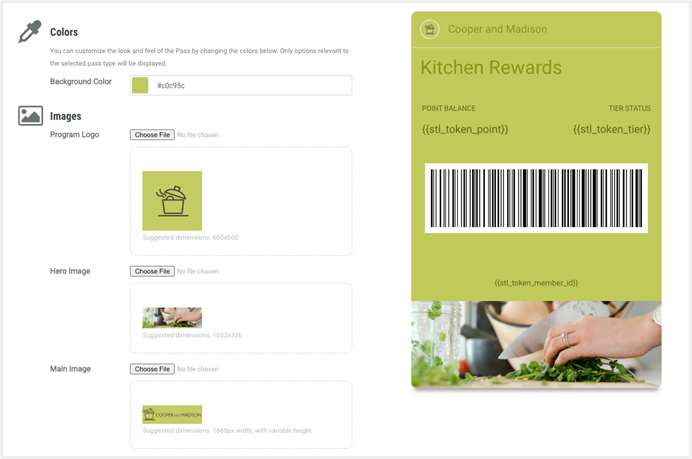
The Color & Images section is used to customize the visual elements of the Wallet Pass.
The layout of
To configure the visual elements of a Google
-
Select the Google tab, then select the Color & Images tab.
-
The platform allows you to customize the Background color. Choose a color using one of the following methods:
-
Enter the desired hex code value.
-
Click the color swatch, then select the desired color from the color picker.
The platform allows you to customize the images used for the Program Logo, Hero Image, and Main Image. For each image, please note the following recommendations:
-
Program Logo: Recommended size of 660x660 pixels.This image should be your brand identifier or logo. The use of a Program Logo is optional.
-
Hero Image: Recommended size of 1032x336 pixels. This wide-format image appears at the bottom of the
-
Main Image: Recommended size of 1860 pixels wide, with variable height. The use of a Main Image is optional.
-
For each option in the Images sub-section, click Choose File. Browse to and select the desired image file. The platform displays a thumbnail image. Click Upload
-
Click Save Changes.
The preview rendering on the right updates automatically as you make configuration changes.
Note: The preview may not always render images to the correct size. Always use the
Front Content
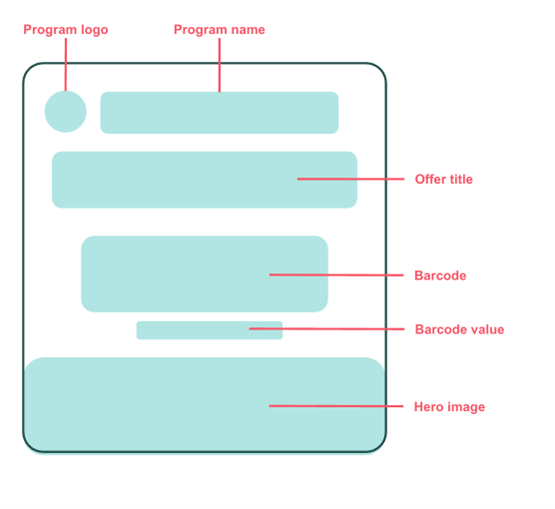
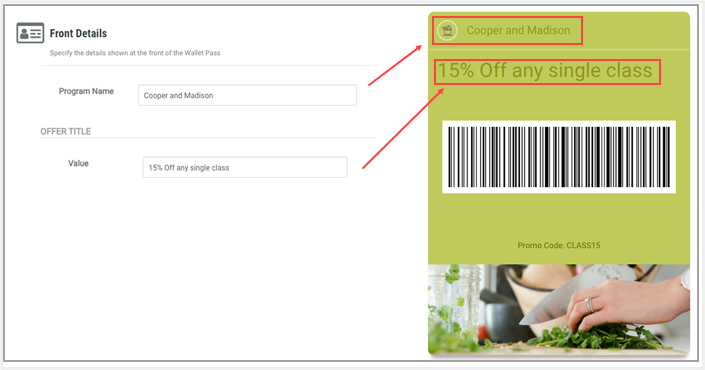
The front section of your Google Offer serves as the primary interface for Members, displaying essential information at a glance. This section must be carefully configured to ensure optimal visibility and user experience.
The Front Content comprises two optional fields:
-
Program Name: This text appears near the top of the Offer, and should contain your program’s official name.
-
Offer Title: Enter a compelling name for the Offer, or use a dynamic value populated by means of a Content Token.
To configure the Front Content:
-
Select the Google tab, then select the Front Content tab.
-
In the Program Name field, enter the name of your program.
-
For the Offer Title field, enter the following details:
-
Value: Enter either a static value or type “@” to pull up a list of Content Tokens, and select a Content Token. This value represents the main text for this field, and is displayed in a larger font size than the Label.
-
-
Click Save Changes.
The preview rendering on the right updates automatically as you make configuration changes.
Below is an example Offer.
Details
The front of your
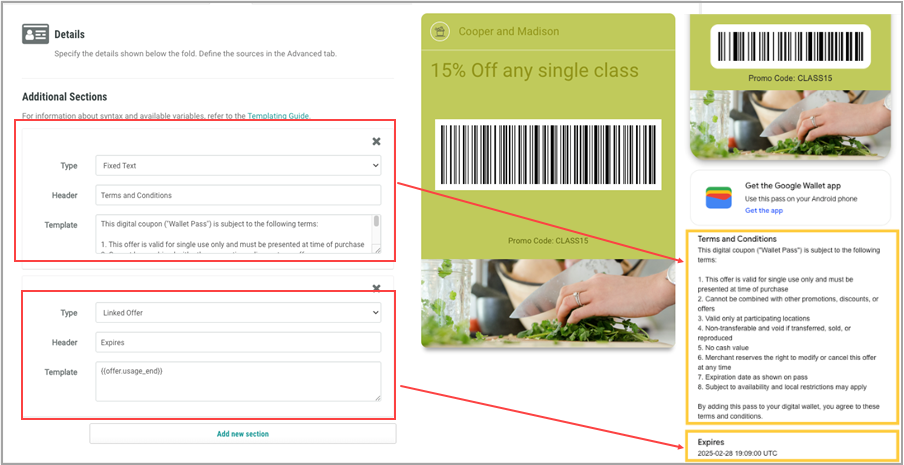
The Details section allows you create custom sections.
To configure the Details section:
-
Select the Google tab, then select the Details tab.
-
Optionally, to add a new section, click Add New Section.
-
From the Type drop-down menu, select the desired content type:
-
Fixed Text: Used for static content like terms and conditions or privacy policies. This content type supports HTML formatting for clickable links and text styling.
-
Stores / Locations: Help your customers find your nearest stores by showing location-based information.
-
Custom: Create personalized content using Content Sources. These Content Sources must be pre-configured in the Advanced Options tab (see
-
-
In the Header field, enter a descriptive title for this section.
-
In the Template field, enter either simple text content, or define advanced dynamic content using Liquid syntax.
A common use case is to utilize Liquid templating to populate one of the Details sections with the Offer Response expiration date. In the below example, the platform will display the expiration date for an Offer Response that has a Pending Status.
{%- for offer_response in offer_responses -%}
{%- if offer_response.processing_status == 'pending' -%}
{{ offer_response.usage_end | date: '%b %d, %Y %I:%M %p' -}}
{%- break -%}
{%- endif -%}
{%- endfor -%
The above example will display the expiration date in UTC. The platform does not support the ability to display a date / time value dynamically based on the Member’s device. Optionally, you can specify the date / time be displayed in your loyalty program’s main time zone by adding the “timezone” attribute:
{%- for offer_response in offer_responses -%}
{%- if offer_response.processing_status == 'pending' -%}
{{ offer_response.usage_end | timezone: "America/New_York" | date: '%b %d, %Y %I:%M %p'-}}
{%- break -%}
{%- endif -%}
{%- endfor -%}Note: For additional help on creating Liquid templates, a Templating Guide link is displayed within the Details tab. This guide provides code samples to support several different use cases, such as listing valid Offers, or displaying the balance of a Gift Card. If using Liquid templating, please be sure your Content Sources and Content Tokens are defined, and all Content Sources have been added in the Advanced Options tab of the Wallet Pass.
-
Repeat the above steps as needed to add more sections to the
-
Click Save Changes.
The below example includes two custom sections: "Terms and Conditions" and "Expires."
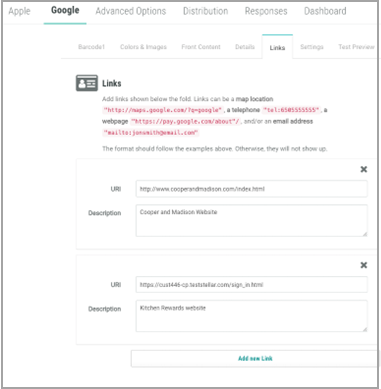
Links
To add links to the Google
-
Select the Google tab, then select the Links tab.
-
Click Add New Link.
-
In the URI field, enter the link’s URI (Uniform Resource Identifier); ensure that this is a valid, working destination.
-
In the Description field, enter a clear descriptive label that tells Members what to expect when they tap the link.
-
Repeat the above steps as needed to add more links.
-
Click Save Changes.
Settings
The Settings tab provides essential controls for managing how Members can share and access Wallet Passes across different devices. These security settings are crucial for maintaining the integrity of your Wallet Pass distribution system and ensuring appropriate access control.
For Google devices, you can configure pass sharing through three distinct permission levels:
-
Multiple Holders (Unrestricted Sharing)
-
Allows multiple Members to access the Wallet Pass on different devices
-
Ideal for promotional passes or general-access memberships
-
Provides maximum flexibility for pass distribution
-
-
One User All Devices (Single User, Multiple Devices)
-
Restricts pass access to a single Member
-
Allows that Member to access the Wallet Pass across all their devices
-
Recommended for personal membership passes or loyalty programs
-
-
One User One Device (Restricted Access) - Not Available
-
Intended for use by select Google partners in limited circumstances; please select one of the above levels instead.
-
To configure the permission settings for your Google
-
Select the Google tab, then select the Settings tab.
-
From the Device and Users Allowed Status drop-down menu, select the desired permission level, as described above.
-
Click Save Changes.
Test Preview
To properly test your Google Wallet Pass, you need access to a Google device. This method provides the most authentic testing experience.
Prior to testing, you must ensure that you have at least one Test Member available in your Loyalty instance. Designating a Member as a Test Member is available on the Member Profile screen (see Edit Member Attributes for more information).
To test a Google Wallet Pass:
-
Select the Google tab, then select the Test Preview tab.
-
From the Member drop-down menu, choose the desired Test Member.
-
Click Add to Google Wallet. A confirmation dialog box is displayed; click Add.
-
An alert is displayed, indicating “This is a mock success. Wallet Pass has been saved to Google Pay.”
-
Click View Loyalty Card to view the Google Wallet Pass contents in a new browser tab.

